Thursday, February 6, 2014

Behavior Chart

So I have the best little girl ever. No, no. It's true. Except for when she's not the best.

We've been talking about first-time obedience and attitude a lot recently with her and we decided we'd give a behavior chart a try. She has one at school that lets her know how well she's doing and she always talks about it. So we thought, why not do this at home!?

Normally they look like this:


If the kid is good, their name moves up on the chart and there is the possibility for rewards. If they misbehave there are consequences, and the more they misbehave the more consequences there are. BUT every day they start out with a clean slate. There's a Bible verse about that somewhere... ;)

Well, I wanted to make one that was a bit nicer looking than the school ones. Here's what I did! Good luck!


Materials from the craft store

Substitute whatever you'd like to make it your own.
  • beveled chip board with holes
  • 2 pages of scrapbook paper (keep in mind what your child likes, but that its going in YOUR house)
  • wooden letter
  • 12 pack of magnets with adhesive backing
  • mini picket fence
  • sticker pack
  • butterfly charm
  • Mica Fragments (not shown)
  • Hemp rope (not shown)

Other Tools and Supplies

  • Mod-Podge or white glue
  • Tacky Glue (I'll explain why I have two types of glue in the directions)
  • Hole punch
  • scissors
  • x-acto knife
  • needle nose pliers
  • wire cutters
  • ruler
  • Sharpie
  • craft paint 
  • paintbrush & foam brush


Step 1

First, color the outer edge of the board black with the Sharpie. It will just make it more finished looking. I colored the edge of the letter black also. 

Then measure the INSIDE edge of the board. You don't want the whole thing because you'll want to see the bevel. So make sure you measure correctly! 

Mark your measurements on the back of your background paper (so your marks won't show on the finished product) and then cut out your paper. Place it on your board and mark where the holes are. I used a skinny pen I had.


Step 2

Punch out the holes and then put a thin layer of Mod-Podge or white glue on the back of your paper. I used the foam brush to put the glue on, because they're cheap, disposable and won't leave hairs on my project. 

Carefully put your paper in place on the chip-board, lining up the holes. Lay it on it's face on a clean surface and put something heavy on it. This isn't horribly necessary, but it makes me feel better about life. 


Step 3

Grab your other paper and roughly cut out around your letter. This just makes it easier to handle. Then put glue on your letter and place it on the BACK of your paper, so the nice side of the paper faces out. 

Place it, paper side down, on a clean surface and put something heavy on it. 


Step 4

While your glue is drying, get your mini picket fence and count out 10 posts. Take post 11 and 12 out of the wires and snip the wires before the 13th post. You should now have a short length with 10 posts on it. 

Use your needle nose pliers to bend the excess wires around themselves so there's nothing to poke anyone sticking out. I used bent nose pliers, but regular pliers would work. Or your fingers, if you're really awesome.


Step 5

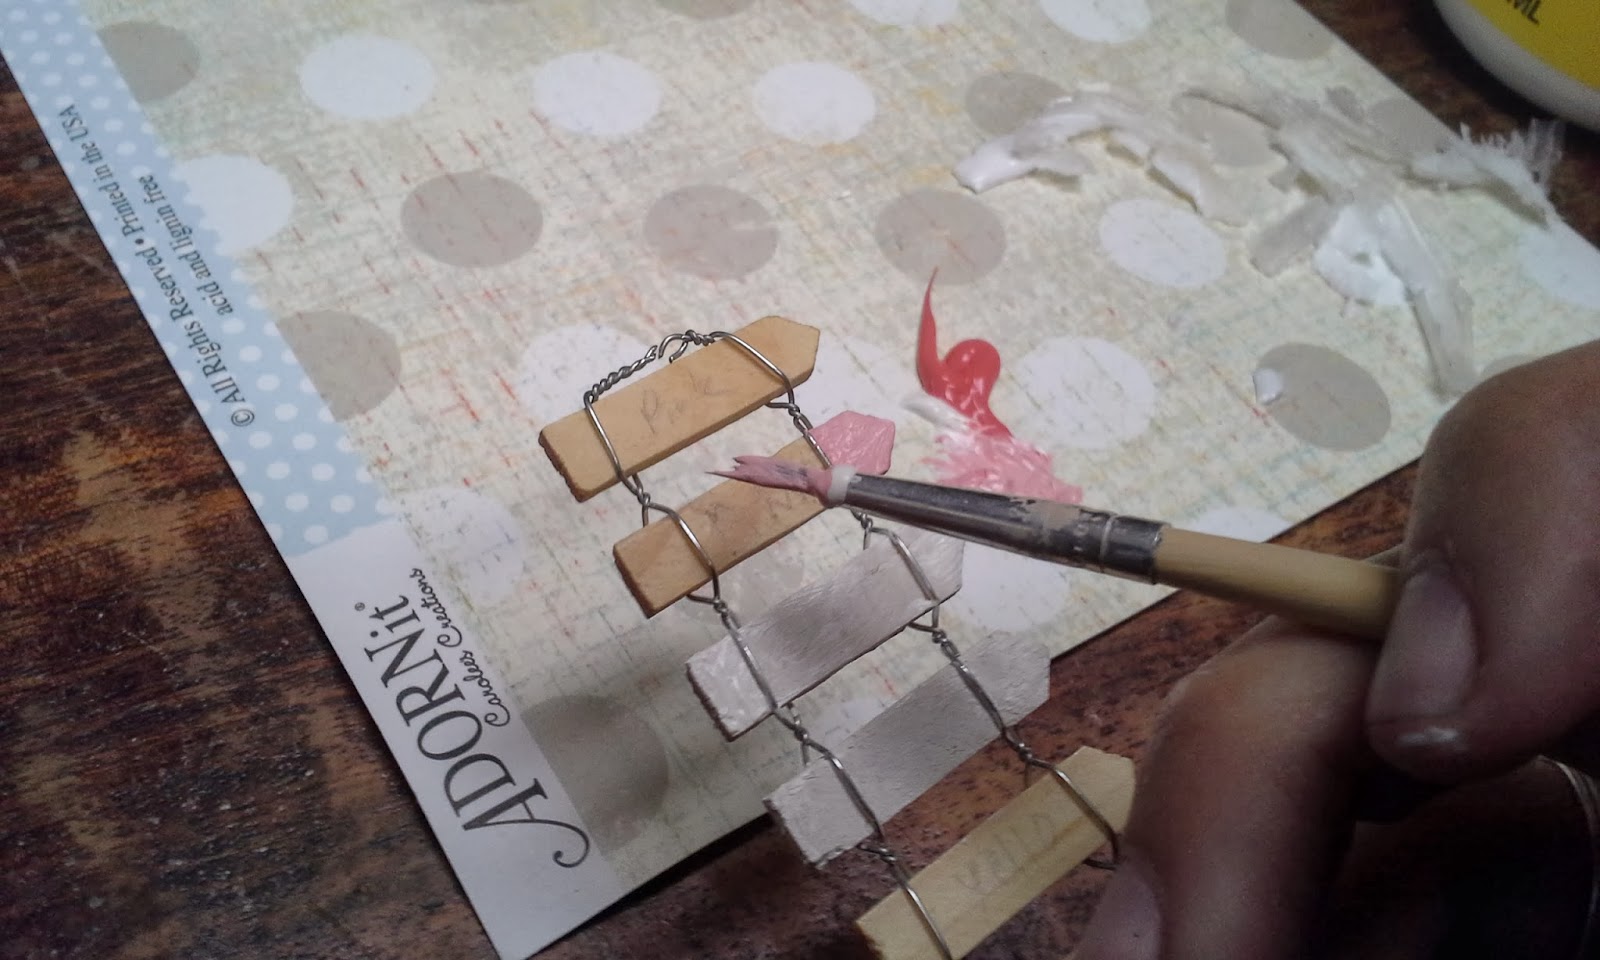
Time to paint!! Pick out a color scheme that goes with your papers and stickers. I decided to use shades of reds and pinks. Except for the white, I mixed a little bit of pink into ALL of the colors, so they would all match. Don't be afraid to mix colors! Experiment. 

I labeled my posts before I painted them, so I wouldn't mess up. But you don't have to. I also used scrap paper as my pallet because I'm cheap and too lazy to get a paper plate. 


Step 6

This step might not be necessary depending on the charm you got. Mine had loops where you could add it to a necklace or something and I didn't want those. 

Cue the wire clippers! It took some effort but I snipped off the loops and used the clippers to nibble it down until it looked right. Be warned though, sometimes the metal on the inside is different from the surface. Also, be VERY careful doing this with something that isn't metal. The stress could crack the whole thing in half. Know that its a risk.


Step 7

Mini step - I took the butterfly and stuck it onto one of the magnets, but I didn't like how I could see the magnet showing. It was the adhesive part too, so that means it would collect dust and dog hair. No good. So I stole some glitter from my daughter (she didn't mind) and put it on. No glue required because the adhesive was already there! 


Step 8

Your glue should be dry by now on your board and letter. Cut out the letter, doing as much as you can with scissors before moving onto the x-acto knife for the annoying part. 

Don't forget to put down a magazine or cutting board to protect your table from the x-acto! 


Step 9

No Picture! Sorry!!

Take more Mod-Podge and coat the nice side of your letter and board with a secondary coat. Using the mica fragments or glitter or rhinestones, whatever you want, give it some sparkle because your little girl is kinda like a crow in that she likes things that are shiny. 

You could use white glue for this also, because it dries clear, but be careful because it doesn't go on as smooth. Just take your time with it and you should be fine. 

Step 10

Put it all together!! This is where the Tacky Glue comes in. Mod-Podge is designed for gluing paper on stuff or coating stuff. It isn't designed to hold large bulky things to other things. So I opted for Tacky Glue, which is much more versatile and has worked in the past. 

White glue would probably work for both, but it does take a long time to dry when its used thickly. 

This is also where you can add additional embellishments like stickers and whatnot. I also put the other magnets on the fence. Make sure your magnets stick together correctly before you put them on. There is a right and wrong way to do magnets!! Just try it out to make sure it works before you glue anything down. 

Add a length of twine or hemp in the holes (not shown) and you're done!! The magnet butterfly can hop around with your child's behavior and hopefully stay on the top levels. 

Just be sure to explain WHY they're in trouble, and you'll find they'll do it less. Good luck with the project and your parenting. 


Wednesday, January 29, 2014

Insecure Thoughts

Most of my other blog entries are fun and focused on making weird crap. This one will be a bit different.

Recently, a friend posted a status asking for some encouragement because she was feeling inadequate.  Understandably, her friends and family rallied around and posted all sorts of great things about her and why they thought she was wonderful. Some also reminded her that God loves her and thinks she is special.

But their comments didn't sit right with me. 

Now before you go all catty on me, I love this friend and I do think she's great and delightful to be around.  Its just that the encouragements her friends brought, encouragements I have brought myself to others at different times, they just rang hollow in my ears.

The truth is, we ARE inadequate.  We are. We all fail at something, be it weight goals, academic goals, housekeeping (the bane of MY existence) parenting, time management, relationships, etc. The list could be endless. Humanity succeeds profoundly at failure.

Normally we attempt to ignore our failures by focusing on our strengths. While this is beneficial to establishing a career and for overall satisfaction in life, our inadequacies will still be there when the day is done. Haunting us. And sometimes, no matter how hard we try, little growth is seen.

What makes things worse is that Biblically, the standard is perfection. AND some verses make so light of our existence that it leaves us wondering, what's the point!? To be told "you are special" and the read "your life is like a breath, like dew on the grass" is confusing in the worst way. Are we special? Do we really matter? Over 7 billion people are alive right now. (And that's not counting everyone else throughout history.) Next time you're in traffic, look around at the horde that surrounds you. You and I are so insignificant, it is mind boggling.

So what are we supposed to do with this? How do we reconcile our dreams of our ideal self with the reality that we, as humans, are human?  How does just one grain of sand find it's worth?

The answer can be, and can only be, God.

Yes, we are hopelessly inadequate. We'll never be good enough, but God loves us anyway. Our failure and inadequacy is precisely why Jesus came. If we were as awesome as we all want to be, the Cross wouldn't have been necessary.  But it was, and you know what, God is ok with that.  Without Jesus, we never would have known the depth of His love for us. I doubt we will EVER truly know the depth of His love, this side of the grave. But we can attempt to grasp at it, pondering the terrible sacrifice of His Son.

And no, when compared to the vast conglomeration of humanity, you and I are not really important. Special. There are others like you, others better than you, others less inadequate. There will always be someone better, even if you never meet them. The problem is that we are basing our identity on our specialness, and that is an easily rocked foundation.  Who are you if your specialness is removed?

You are still you, with or without your strengths AND weaknesses.

I believe this is who God sees.  Just me, stripped naked before the throne, all of my talents and failures strewn about the floor at my feet. All I can do is look at them in despair, desperately trying to weigh out the good and the bad on the scales of justice, praying the good carries more weight.

But this is no Greek Myth. There are no scales. Jesus comes in and kicks the piles aside and embraces  me. The lover of my soul does not judge my value by my inadequacies. He KNOWS I won't make it! The wounds on his hands and feet prove His intimate knowledge of my failures.

Like the prostitute, He helps me up and encourages me to keep trying. "Sin no more." Don't give up. Come on, let's keep going. There are no false words about my significance or ability, just His arm helping me take the next tiny step forward.

And, in spite of my miniscule little blip of an existance, He knows me. This doesn't make my life any bigger in the world's eyes, but it makes HIM all the more spectacular in my eyes. With all of the countless people that have ever and will ever live, He knows me. He cares. The God who directs galaxies and holds molecules together knows me. He guides the rise and fall of Kings and Empires, and He ALSO took the time to figure out something for little, insignificant me. That doesn't make me great, it makes me loved and that is more important than being great.

I am inadequate. But Jesus saved me. I am insignificant. But the God of eternity knows my name.

Only with Him is there any hope, any value and any purpose.

Thursday, October 17, 2013

Sail making Supplies

There's one thing you'll learn VERY quickly about boat building: it goes VERY slowly.

Not a ton of progress happening over here, but things are moving forward. I'm still working on the sail. Right now I'm working on reinforcing the edges. I actually made a video about the sail and I'm going to try to start posting on YouTube as I progress. The video explains a lot of why I'm doing what I'm doing and a lot about why I'm choosing these particular materials for my build.

Here's a picture of when I was sewing the yellow rope into the folded piece of tarp.
I didn't go into this on the video, but the presser foot I'm using is a specialized 'embelishing' foot that is made for going over cord. It was $5 or $10 I think, because things run a little expensive for my machine. But I think this foot is totally worth the expense and I've gotten a lot of use out of it with all sorts of decorative and utilitarian elements.

That said, you can TOTALLY sew the rope in with a regular foot. The fact that the rope is hollow makes it easier.

The other thing that happened that I'm excited about is I got rope.
Just a little bit of rope. Not too much. You can never have too much rope.

A video showing my childish exuberance for something as mundane as rope. Feel free to mock me. 


So I know I threw two videos on here this time instead of my normal pages of words, but I'm sure I'll find the balance soon between spoken and written word.

I'm gonna go sew something.

Friday, October 11, 2013

A piece of Junk Sail- pt3 of the Ulua Proa project

Lookit!

I know, I know. You see a kid, Cheez-its, a tarp and a pole.

I SEE a sail, mast, hard-tack and my galley-slave-er-I-mean-second-mate... Yeah.

Ok, so the sail is just a tarp. It's a $30 heavy duty tarp that we cut into the right shape and then sewed "cambers" or darts into to give the sail a bit of a shape. I still need to reinforce all the edges and corners.  We were going to make the sail out of cotton but I think it will mildew if we don't get it perfectly dry every time. And that's annoying. Someday I'll drop the money into nice sail cloth but for now, all that money needs to go towards the actual boat.

I did discover that my sewing machine does NOT like the UV stabilized poly thread that I'm using. Then my husband tried to use it to make a button hole on a different project. Heh. That didn't work. Its good stuff that will hold up to the sun's violence, but its just thick.

The mast is a 12' aluminum windsurfing mast that I got on Ebay for $50. I'm not certain it will be tall enough to allow for the boom (the wood pole at the bottom of the sail) to clear our heads, so we might make a modified stub sail like this.
Why? Because I don't like concussions. 

The other thing I purchased of interest recently was three shark teeth. This is quite random, but so am I so don't worry about it.
I got one for each of our small family and I intend to sand down the edges a little so they're not as dangerous then mount them on the bow. See that little nubby thing on the tip of the boat? That's called the manu and sometimes its quite elaborate. Therefore, that means I get to have some fun!!

At first I wanted to put a dragon head on the bow, Viking style, cuz I'm a Viking. But then, considering that this is a Pacific Island boat, the Norse Firedrake didn't seem appropriate. So my mind wandered back to the time we sojurned at the Polynesian Culteral Center in Hawaii and visions of weaponry burst forth upon my minds eye. Sorry, the mention of Norse Mythology sometimes causes me to wax poetic. I'm done now.

We saw many examples of weapons like this. A tribal man's brass knuckles and dagger combo.
Carved wood, with shark's teeth lashed to a groove in the edges to create a beautiful weapon that I wouldn't want to be attacked with. For a pre-metal society, these were probably very effective. Well, I've always been fascinated by the history of weaponry, so incorporating something like this seemed appropriate to me.

The only challenge is to do it in a way so we don't damage ourselves on the teeth. This will be fun.


Monday, October 7, 2013

Already running into squalls! Building the Ulua pt 2 of many... The Junk Rig

You know the phrase, "the honeymoon is over?" Well, we didn't even get to the dating part of this project before we hit some major challenges. Its like we got in a fight the second time we saw each other. Such is life, right??

So here's the problem. Our garage is 22 feet long. The Ulua is 17'8" long. No problem I though. Well, it turns out it might be a major problem because of all the crap we have. But we press on, ignoring the problem right now like responsible adults. We'll burn that bridge (or stored crap) when we get there.

We're more than halfway done with the lofting. This gloriously beautiful pile of plywood is the beginning of greatness.
At least, that's what I'm telling myself. 

While I wait to do the cutting with my hubby, I spent the morning trying to wrap my head around the sail plan and rigging for the Junk Rig. Historically a traditional sail for Chinese ships, the designer of the Ulua tried it on one of his other outriggers, and he said it worked wonderfully. I've always been a fan of the unusual and I don't really like the lobster claw rig, so I'm going for the junk rig!

I'm going mainly from this page, but this whole website is a HUGE wealth of knowledge on all things boat-building related. I was able to contact the designer of the Ulua and he said the 78 sq ft sail plan on the Duckworks site would be fine for the Ulua.

Then I was silly and I ordered a mast from Ebay. It's 12' aluminum in 3 pieces. It looks like I'll need an extension for the base, but that shouldn't be too difficult to work out.

I thought it might be wise to figure out how much the rigging would cost for the sail, so after much toil I realized I don't know as much as I thought I did. Isn't that always the case. Also, the blog on the Junk Rig makes some assumptions that were hard for a first time boat builder/sail builder to grasp.

So I thought I'd try to clarify a little, assuming I've figured it out correctly!!

To start, I like to get everything all on one page, so I can see it all together, how it would look when sailing. So I made this and tried to color code everything.
This is specifically for the 78 sq ft sail, so the sheetlets are a little different. But this is how I understand it. I don't know if that's helpful or more confusing!! I would read and re-read the Duckworks article, and go to the Junk Rig Forum if you have questions.

The only thing I still don't get is what does the main sheet get clipped to? We'll see. Time for... MORE RESEARCH!!

I tried to itemize the hardware needed for the rigging. When I priced it all out, buying mostly from Amazon and Duckworks, it came out to around $100, not including sail cloth and battens. That's encouraging, at least. For lots of info on cheap sails, check out http://www.polysail.com/. Makes me all warm and fuzzy knowing there's other ridiculously cheap people out there.

Sunday, September 29, 2013

New dreams! Starting to build the Ulua Proa...

Long time, no blog! We're starting a new project over here, so trying to blog again seemed appropriate.

In the past few months we've made Pirate hooks... And giant lizard tanks...


Sold bunnies and bikes....
 
...To make room for new dreams.

Like THIS!!
This is a strip built sailing "proa" which is kind of like a catamaran with uneven hull sizes. Yes, we're probably biting off WAAAAY more than we can chew. But that's pretty normal for me. 

I've wanted to build a boat for 8 years or more. I have probably 3 dozen different boat plans saved on various computers. This particular one is called the Ulua by Gary Dierking.  There's debate around here on how to pronounce that properly. If you're at all interested in building one for yourself, this is his website, and this is the book we're building from. 

These are our other two favorite boats that we were looking at. The first one is the Light Scooner by Phil Bolger. There's a hysterical blog about some builder/sailers with quite a few fun stories. Please ignore the annoying music...

Then this is the other one we were looking at. The Arctic Tern by Tad Roberts. We loved the look of this boat and the plans were free but..... We wanted something we could sail solo and a 24 foot boat just isn't that. It was sailed to Alaska and back and that makes for major awesome points. 

So we landed on the Ulua. 
I like it. 

Our first step was anything but glamorous, but to us (me) it was exciting. Wanting to do something for 8 years and then finally getting to mark the first measurement on wood was like taking the first step on an epic journey. 

The road goes ever on and on, 
down from the door where it began...

Anyway, this was the first step. Lofting. It is NOT as scary or mysterious as some sites make it seem. If you can follow directions well and know how to use a tape measure and square, you're good. It's basically drafting a graph and then plotting the points along the curve, making the outline of the mold for the hull. 
Simple in concept, but overwhelming the first time you see one of these offset charts...
Yeah. That's all you need to build a boat hull. 
(These are not the offsets for the Ulua. Buy the book!)

So we got this. The outline for our first mold station. Only 16 more to go! 
Tell me now if it looks crooked to you. It totally does to me in this picture....

I'm going to try my best to take pictures regularly and post as we go. I think this stuff is interesting, maybe someone else will too! 

ps- I want to put one of these sails on it.
Because I can.


Tuesday, June 11, 2013

Lock Picking with a soda can - Fail

I've always wanted to try to open a padlock with a soda can. These guys did, whilst inebriated...
Granted, the guy's hair is ridiculous, but the idea is interesting. I've heard about it from many sources, many times, so I've always wanted to give it a go.

In case you're totally confused, my job involves security. Knowing how locks work and how to get around them is part of my job. Legally! If you're curious, this is where I work.

The other day we were given some chain that had a few padlocks on them that they had lost the keys too. Perfect opportunity to show off my lock picking skills!!! Yeah, my hubby totally showed me up by picking his lock in a few minutes (he got the easy one, in my defense) and I couldn't get mine.

The simple solution would be to grab the bolt cutters and just snip off the chain, but where's the fun in that?

So this is what happened.
Here's my empty can, the evil lock, my pile of lock picks who ALL failed me and the lock that my boy opened way to fast! 

I basically just followed the instructions on the video. Cut open the can with regular scissors, make the shim, etc. We put it in, like they said, and tried rotating it. 


Nothing. So I tried again. 

Nope.

FOUR TRIES LATER.... I asked my man to try. Cuz he's that guy who can do anything. And he's so humble about it too. I felt totally justified when he couldn't get it either. He even sliced his thumb open trying to get out a piece of can that ripped off inside the lock. 

So obviously, we were doing something wrong. The solution?

We did what real thieves do. No fancy skills with lock picks or spiffy home made by-pass techniques. We busted out the bolt cutters and snipped open the chain. Done.

This got the lock off the chain, but this felt like such a defeat!! Stubbornness reared up its ugly head of defiance and I sat down with the rebellious lock and my favorite pick. A few minutes of patient and focused attention and the thing succumbed to my will. With that oh so satisfying click, the lock plug twisted and the shackle opened up. VICTORY!!

My conclusions are thus.
  1. The Spam School guy has ridiculous hair.
  2. Either we were doing something wrong (requires more research/attempts) or its a myth. 
  3. I like my favorite hook pick. 

If you're curious about lock-picking as a hobby, there are lots of tutorial videos on YouTube to get you started. I also recommend finding a lock picking group or TOOL group near you. They'll have great advice and are generally fascinating people to be around. Or you can just shoot me a comment and I'll answer as best as I can.

Necessary Disclaimer: I am in no way encouraging any illegal activities!! What you do with knowledge you may gain here is completely and totally your responsibility. Lock picking is an interesting hobby and should never, NEVER be practiced on a lock you don't have permission to pick, or on a lock that is important to you. (like your front door) Incorrect picking can permanently damage a lock.